Tapps33
Full Access Member
Well, it's officially begun....or rather continued from a few years ago.
Long story even longer, I've dreamed of swapping the Supercharged 5.0 AJ133 into my LR4. Fast forward what I believe has been at least 4 years and 3 moves and now I'm moving again and will be stuck in an apartment with no shop nor access to my tools for the next year. I have 4 weeks and it's do or die time!
Background: I bought a 2012 LR4 with a "blown head gasket" last year for my son to drive. He and I compression tested it before we bought it and it checked good...so I thought new head gasket would save the day....it didn't. So, instead of putting the SC engine in my wife's LR4, my son took her LR4, and as soon as I get this one running, the Dark Knight will become her DD.
Thankfully, I'm not starting from scratch. I've been compiling parts and contacts for roughly 5 years now. I had the block, heads, crankshaft and pistons machined where I previously lived. That was almost exactly 2 years ago. Unfortunately, at the time, it took the guy roughly 7 months to get to my engine. But his work was exquisite! The heads were surfaced/decked, new exhaust valves and a valve job for all valves, the block was checked straight, cylinders honed, crank journals were line honed, crankshaft was balanced, pistons were balanced, and rods were line honed for precision.
I had to leave my engine hoist and stand at my last place because I didn't have the room for them. Thankfully, Harbor Freight and Northern tool were there for me.
I mounted the engine and have started to install the pistons...but of course cracked an oil ring. Thankfully, roverpartsdepot hooked me up with a new set of rings and they arrived today.
However, to kick this build off, I bought a used SC transmission off eBay. Given the fact that it's an eBay transmission, I figured it was toast and even if it wasn't I should probably give it a quick rebuild. So, the majority of the work thus far has been disassembling the trans. I cleaned the parts this morning and will start reassembling tomorrow.
A couple of good resources for tear down and build up:
The guy that made these videos is awesome! I wish his reassembly video had been out when I did the Sonnax Zip kit on my first mechatronic...cause I TOTALLY lost track of where one of the ball check valves went!!! (Thankfully I guessed right...I think...it's in the Black 2012 LR4 I'm building the engine for.....so time will tell.)
Tomorrow I'm going replace the bushings in the unit:
Granted, the above videos are for a ZH 6HP26, and not the 28, the bushing kit fits both units. So, I'm going to go out on a limb and say pretty much everything else is the same, or close enough.
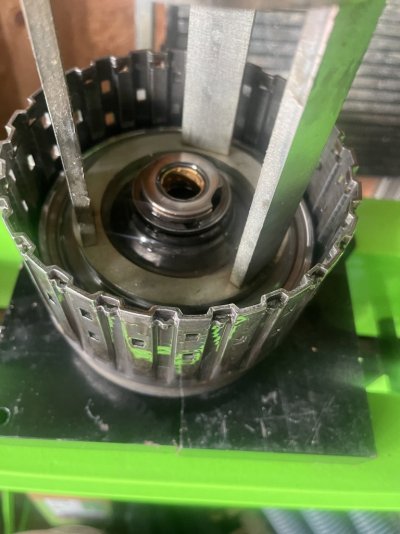
Here's a few pics of the transmission tear down; Please bear in mind, Curmudgeon's videos and significantly better than any of my pics, but at least you'll know it's pretty easy to tear them down.
Also, I used the adapt a case press cage as well as an amazon purchased press tool to get the drums apart.
 adaptacase.com
FYI, the adapt-a-case cage was a little too small for some of the drums, hence why I had to get the amazon thing.


Ok, I'm going to post a few more pics, then call it a night....more to come tomorrow!
Long story even longer, I've dreamed of swapping the Supercharged 5.0 AJ133 into my LR4. Fast forward what I believe has been at least 4 years and 3 moves and now I'm moving again and will be stuck in an apartment with no shop nor access to my tools for the next year. I have 4 weeks and it's do or die time!
Background: I bought a 2012 LR4 with a "blown head gasket" last year for my son to drive. He and I compression tested it before we bought it and it checked good...so I thought new head gasket would save the day....it didn't. So, instead of putting the SC engine in my wife's LR4, my son took her LR4, and as soon as I get this one running, the Dark Knight will become her DD.
Thankfully, I'm not starting from scratch. I've been compiling parts and contacts for roughly 5 years now. I had the block, heads, crankshaft and pistons machined where I previously lived. That was almost exactly 2 years ago. Unfortunately, at the time, it took the guy roughly 7 months to get to my engine. But his work was exquisite! The heads were surfaced/decked, new exhaust valves and a valve job for all valves, the block was checked straight, cylinders honed, crank journals were line honed, crankshaft was balanced, pistons were balanced, and rods were line honed for precision.
I had to leave my engine hoist and stand at my last place because I didn't have the room for them. Thankfully, Harbor Freight and Northern tool were there for me.
I mounted the engine and have started to install the pistons...but of course cracked an oil ring. Thankfully, roverpartsdepot hooked me up with a new set of rings and they arrived today.
However, to kick this build off, I bought a used SC transmission off eBay. Given the fact that it's an eBay transmission, I figured it was toast and even if it wasn't I should probably give it a quick rebuild. So, the majority of the work thus far has been disassembling the trans. I cleaned the parts this morning and will start reassembling tomorrow.
A couple of good resources for tear down and build up:
The guy that made these videos is awesome! I wish his reassembly video had been out when I did the Sonnax Zip kit on my first mechatronic...cause I TOTALLY lost track of where one of the ball check valves went!!! (Thankfully I guessed right...I think...it's in the Black 2012 LR4 I'm building the engine for.....so time will tell.)
Tomorrow I'm going replace the bushings in the unit:
Granted, the above videos are for a ZH 6HP26, and not the 28, the bushing kit fits both units. So, I'm going to go out on a limb and say pretty much everything else is the same, or close enough.
Here's a few pics of the transmission tear down; Please bear in mind, Curmudgeon's videos and significantly better than any of my pics, but at least you'll know it's pretty easy to tear them down.
Also, I used the adapt a case press cage as well as an amazon purchased press tool to get the drums apart.
Adapt-A-Case transmission tool T-1302AC Overdrive Spring Compressor For A500, A518, A618
Adapt-A-Case Transmission tool the T-1302AC, intended for A500, A518, A618 sping compression.
adaptacase.com
FYI, the adapt-a-case cage was a little too small for some of the drums, hence why I had to get the amazon thing.
Ok, I'm going to post a few more pics, then call it a night....more to come tomorrow!