Project Dark Knight Rising

Disclaimer: Links on this page pointing to Amazon, eBay and other sites may include affiliate code. If you click them and make a purchase, we may earn a small commission.

Tapps33

Full Access Member
Joined
Jul 23, 2019
Posts
418
Reaction score
349
Location
Bath, Maine
I’m sorry to hear. Stiff upper lip. Get the block head and heads checked. With you there.

I plan on pulling the heads, again, to get them re-checked at a shop near me. Maybe they got damaged during the move to TN or something? As for the block, that's a little trickier. I don't have the capacity to lift the body to pull the block again, and there's a lot of crap that has to be removed to separate the engine and trans, most of which is in the back of the engine and almost impossible to see with the body on. So, I think I'll end up doing a "poor man's decking" in the engine bay. Rather than use thin steel, I'm going to go find some good heavy duty (aka 3/4"+ thick) steel plate and get it machined flat. While not ideal, and certainly not the easiest, it'll get the job done. Unfortunately, at this point I'm running out of time and options to do it perfectly right. (aka pull the block back out and take it to a machinist) Admittedly, I suspect the block deck wasn't within spec and the machinist had simply forgotten to do it while machining the block, and he just didn't want to put it back in the machine. Time will tell of course, but in his defense, I should have double checked it while the engine was on the stand. The sad part is that I usually check all those things when assembling an engine, but I was in a hurry with this one....and that's when mistakes happen!

All the above is to say, I'm going to keep pushing forward because as anyone who's ever rebuilt and engine knows, it's rarely a straight line process!
 

Tapps33

Full Access Member
Joined
Jul 23, 2019
Posts
418
Reaction score
349
Location
Bath, Maine
For whatever it's worth, I'm rooting for you on this.
Thanks! I appreciate the support!

I've got the heads back off and am taking them to the machine shop sometime this week to be pressure checked, cleaned and resurfaced. (Not gonna lie, kinda jacked up the one head trying to get it pried off the block. That said, I've heard a rumor that the LR cams are slightly different than the JAG cams, so while I'm back in Memphis, I'm going to pick up my spare set of heads/cams that cam off a RRS and get them machined as well. It kinda makes sense, the torque profiles are significantly different between the two brands. I always assumed it was a PCM thing, but I've heard that may not be the case.

Hopefully, everything will go back together nicely and I'll have TONS of good compression on both banks.

Quick service announcement: For those that choose to install head studs. You can't remove the head with the studs in the block. But, assuming they'll back out, you can unscrew the studs and pull the studs/head at the same time. Or, in my case, the studs and steel inserts at the same time. (Totally figured that out on the 2nd head....not the first. SMH).

I will say this. I was worried about having the correct stud length, and the length was perfect!!! I still had 1/2"-3/4" of thread left on the head side, and the block side was fully seated into the insert! For those of you counting, that's roughly 3 times the grabbing force than just a stock head bolt in the Aluminum.

What you're seeing is the bottom of the insert....and they're about 1.5" long...give or take.
IMG_1484.jpeg
 

Tapps33

Full Access Member
Joined
Jul 23, 2019
Posts
418
Reaction score
349
Location
Bath, Maine
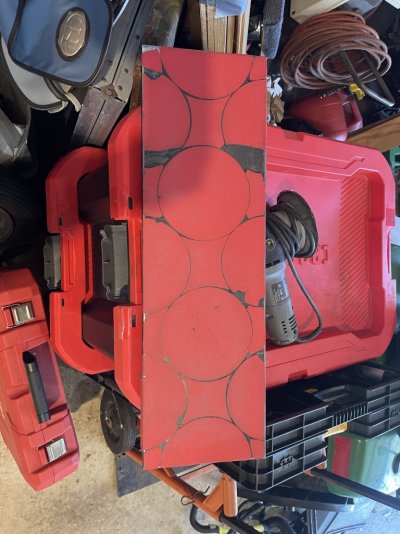
OK, so I finally got a little work done this past weekend. It took me roughly a day or so to get my deck prepping tool made...and that was mostly because it took the JB weld that long to set up.

Basically, as I don't have the tools on me to pull the block back out, I'm "decking" it in the engine bay. Not my preferred method, but hopefully it'll be enough. I only finished one side this past weekend, and probably sanded for roughly 2 hours.

My tool...or tools of choice are a large piece of flat stock still I bought from a welding shop for $40. then, I picked up a cast iron lapping plate from eBay and had my machine shop actually surface it.

Here's the cast iron lapping plate:

I tried to sand the steel stock as flat as I could, and it's probably within .01" of being flat...but it's flat enough as long as you keep it moving and switch directions and what not. I JB welded a piece of 2x4 to the steel so I'd have a handle, then used stick on sanding discs underneath. Usually, I just use sand paper with adhesive, but this was faster, less messy, and after talking with a master machinist, he recommended the "multi disc" setup as it allows "channels" for the particulate to move off the sanding surface into. I used 120 grit discs, but have 80 and 40 just in case. (Full disclosure, I got the 40 grit to tackle the steel plate).

Here's what I came up with:

IMG_1592.jpeg


IMG_1593.jpeg


All in all I have to say it worked better than I thought it would. It took roughly 2 hours to sand it down as far as I wanted...and by 2 hours, I mean probably like 1 hour of sanding and 1 hour of resting cause that plate weighs like 80lbs and sliding it around was not easy!

Using a straight edge and feeler gauge, everything was flatter than .0016", which is better than the .002" variance I was hoping to achieve. Now, I only did the one side as I was tired, and I had to move the fuel lines and starter power wires from the other side to give me enough room to fully slide the plate across the block. After I sand the other side, I'll use coarse (120 grit) and then fine (220 grit) lapping compounds to polish the surface even further...and hopefully get it just "that" much flatter.

Here's a pick after the first 15 minutes of sanding, you can still see portions of cylinders 2, 4 and 6 are still low:
IMG_1594.jpeg


Finally finished sanding, just a little "staining" on the outer edge of 4 and 6, but it checked flat so I'm calling it good enough!


IMG_1596.jpeg


Hopefully I can get back up there next weekend or so to get the other side done. After that, I'm gonna bolt the heads up, get the cams and timing gear in place and crank it over. If I have good compression, I'll keep going....if not, the Dark Knight may be deemed a lost cause.
 

Attachments

  • IMG_1598.jpeg
    IMG_1598.jpeg
    158.9 KB · Views: 9

16FujiDisco

Full Access Member
Joined
Jan 20, 2020
Posts
361
Reaction score
179
Location
Nashville, TN
Did you take any kind of measurements before to see how out of ‘flat’ it was to begin with? Did you see any obvious signs of of head gasket failure once you got it apart?
 

Tapps33

Full Access Member
Joined
Jul 23, 2019
Posts
418
Reaction score
349
Location
Bath, Maine
Did you take any kind of measurements before to see how out of ‘flat’ it was to begin with? Did you see any obvious signs of of head gasket failure once you got it apart?

No, unfortunately I didn't take any "pre-sanding" measurements save just putting my straightedge against the block and looking for light.

That said, I didn't see a whole lotta light. Granted the angle was terrible, and it's hard to see through the front of the grill to check. Which leads me to the conclusion that while it wasn't flat, I don't think it was really all that bad.

To answer your question though, I haven't found the "smoking gun" failure point...and that makes me nervous. I did end up destroying the head gasket getting the head off....cause I was totally trying to get it off without having to cut any studs....I was not successful and cut several. So any real failure evidence on the gasket was lost. But looking at the imprints on both the block and head, I didn't see any "blowout" marks in the coppercote. Granted it only ran for 30 seconds, so I'm not sure how much I'd be able to see with such limited run time.

I do have a theory, but I don't know how realistic it is. If you remember back when I was putting the engine in the car, I believe I told you it rotated out of its hoist sling coming off the engine stand. It landed on the rear corner of the left bank valve cover, and all I did to fix it was replace the valve cover. perhaps....and this is a long shot, but perhaps, when it hit, the jarring action exacerbated an already weak head gasket seal. Sanding the block as much as I did told me it was not perfectly flat, and the cylinders were definitely low. The impact may have had no bearing on the issue, and it may simply have been a poor seal between the gasket and the block and/or head.

Time will tell! I'll get both sides sanded and polished, and then we'll see if the compression is good...fingers crossed!

My real problem is that I'm already thinking of the other things I want to do to the engine, like swap out the radiator and mechanical fan...get rid of the mechanical water pump, ditch the thermostat and half the hoses, and possibly redesigned the super charger air cooler intake design...but before I can really do any of these things, I need a running engine.
 

Tapps33

Full Access Member
Joined
Jul 23, 2019
Posts
418
Reaction score
349
Location
Bath, Maine
Methanol injection?
No, I’m looking at something to increase airflow and reduce temperatures…and allow me to possibly swap out for a larger SC.

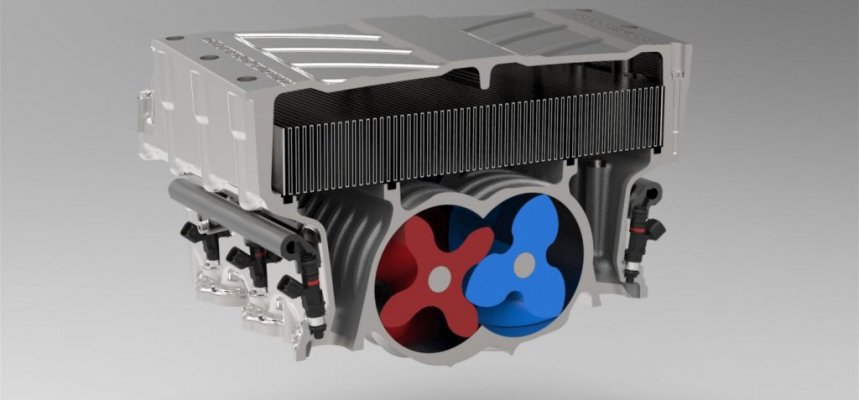
I’m thinking of trying to mold something like the whipple design:

sema-2017-3-0-liter-whipple-gen-5-2018-coyote-blower-0002-1440x670-2.jpg

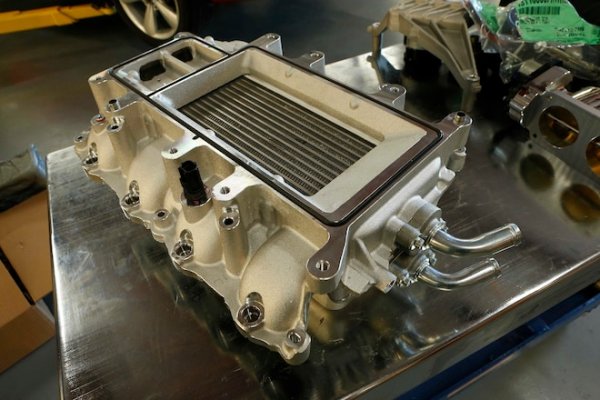
Or maybe the coyote:

022-50-coyote-mustang-engine-intake.jpg

I feel like a taller SC cover plate will help the airflow better withing the stock SC setup….i mean, GM did it with the LT series engines for the Corvette. 2017+ vettes have a taller cover, and it nets 27HP and lower intake temps.

It’s also been suggested that I mill some 1/2” PTFE spacers to sit in between the cylinder heads and SC manifolds. This will “disconnect” the engine heat from transferring into the SC.

While I don’t plan on racing it, if I can come up with a few upgrades, when/if I’m pulling heavy, uphill in the heat of the summer…in the desert, I don’t want the engine to go into limp mode because the Intake temps are out of control!

All of this is of course predicated on the engine actually running. (SMH)
 

16FujiDisco

Full Access Member
Joined
Jan 20, 2020
Posts
361
Reaction score
179
Location
Nashville, TN
Have you seen the VelocityAP / Harrop TVS2300 supercharger upgrade for the V8SC? Direct swap, 20% more SC displacement
 

Tapps33

Full Access Member
Joined
Jul 23, 2019
Posts
418
Reaction score
349
Location
Bath, Maine
Have you seen the VelocityAP / Harrop TVS2300 supercharger upgrade for the V8SC? Direct swap, 20% more SC displacement

Yes, I've been looking at that. It still has the same charge cooler design though. I mean, that's the great thing about it, it's 100% stock bolt up!

With heat soak being such an achilles heel for these things, I feel like even the Harrop SC will suffer the same issue until the heat issues are addressed. With that said, I would argue the Harrop SC would develop less heat than the stock charger as you're not overdriving it to achieve higher levels of boost.

But...if we have the height to form a taller SC cover, and redesign the cooler so it's more like the Whipple, aka it cools the air directly out of the SC, and then cools it again when it makes the downward turn, you could in essence double the effectiveness of the charge cooler. possibly even more depending on how efficient your cooler brick is. Plus, from an aerodynamic stand point, giving the air a little more room to turn back around and into the engine reduces back pressure and increases flow...thus reducing heat and increasing maximum airflow efficiency.

These are just some thoughts, and side distractions I've been thinking about. Mainly cause I'm stuck and can only work on my car every other weekend or so. But if I bring the SC back to the house, I could totally fab something up during the week! :evil:
 

Latest posts

Members online

Forum statistics

Threads
36,702
Posts
222,587
Members
30,876
Latest member
Ejp1989
Top